Tammy is my neighbor and one of the best people I know.
We were moms together; we each have two boys the same age, one quiet, one loud...she understands and loves my kids more than almost anyone.
Now that all our boys are grown and flown, Tammy and I are still very close.
I took some pictures of her during the annual 4th of July BBQ she and her husband Frank have every year...knowing I wanted to use her as the subject of a new "Frame it With Flowers" portrait. I didn't tell her though!
It's a very portable project and I've taken it with me on my summer travels, as you will see. I decided to mount it when it was finished, to keep it flat and easily hangable on the wall.
So meet Tammy....
I have learned from long experience that a printed photo has to be thoroughly stabilized before appliqueing it onto a background. So this photo has three layers: first it is interfaced with fusible interfacing, then it has a layer of batting slightly smaller than the photo, then another layer of fusible interfacing overall, which holds the batting into place. This works perfectly.
Tammy showed me this vintage print she found and loves, intending to hang it in the living room that she and Frank are turning into their library, now that the boys are gone. They own thousands of books.
I took this as my color scheme for the flowers I was going to make.
So I got started. The outer fabric is vintage linen in a color that matches the frame of Tammy's print. I am so sneaky!
As I said, this is a great project for traveling.
First it went to Atascadero, CA where I was teaching the class, "Frame it With Flowers".
You can see it on the table in the foreground right.
I love this class so much because the photos everyone brings to frame all have such meaningful stories...
Next I took Tammy to Vermont, where the
Quilt Alliance was holding its annual board meeting.
This year's meeting was in the studio of
Frances Holliday Alford. We not only brought our own projects to work on during the meeting, but Frances had covered the whole table with canvas and set out markers and paints for us to cover it with during our time there. Yay Frances! I circled my place at the table so you can see my project.
Next up was the first Salon of Mark Lipinski's
Slow Stitch Movement in New Hope, PA. He wrote an excellent blog post about it
here. You definitely should check out his website to see what this is all about.
Tammy and I were in exalted company. From left to right next to me is Chawne Kimber,
Liza Lucy,
Mark, and
Meg Cox around the table. If you don't know Chawne's work, drop everything right now and go see her quilts
here. And her astonishing redwork
here. (Not for the faint of heart!) The fact that Chawne is a full professor of mathematics awed me for sure, but her work does even more.
Liza is business partners with
Kaffe Fassette and she had a whole room in her home with his fabrics for her mail order business.
Treasure indeed....
Then I came back home and finished up my project. Here is how I mounted it:
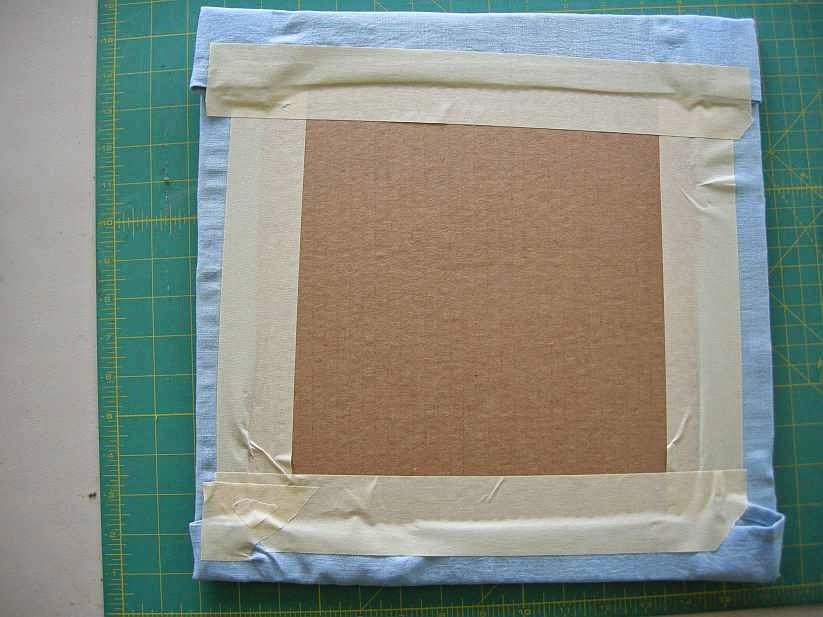
1. I cut a piece of batting to fit 1/2" larger all around than the finished size of my block, which is 14" X 14". I adhered the batting with a shot of Sulky fabric adhesive spray.
2. I couldn't find any foam core in Washougal where I live, so I went with some clean heavy cardboard from a box. This was cut at 14" X 14".
3. Using wide painters' tape, I gently stretched my project over the batting and cardboard and taped it to the back. I found that first ironing the folds along marked lines was very helpful.
4. The back of the cardboard needed some padding too, so I cut a piece of scrap fleece exactly 14" X 14" and sprayed it to the back of the cardboard.
5. I cut the backing (also vintage linen) and finished it to size. But before sewing it on, I prepared the means to hang the block with cording. I inserted each end to the back of the backing fabric, and zig zagged the ends in place.
6. It was easy to pin the prepared backing to the back of the cardboard--I just inserted the pins straight in to secure the layers. Then I took it outside and finished up, removing the pins as I whipstitched the backing to the folded over edge of the block.
And there is my Tammy.
One of my favorite parts of this project was looking down at her smiling face the whole time I worked.
Here's a detail:
I liked making that kind of wispy outer frame out of the big embroidery stitches. ;-)
Tammy had no idea this was happening so when she came over to tour the garden (she and my husband are great gardening pals)....
....I led her into my sewing room so she could see her portrait on the design wall.
Well, she started to cry which made me so happy. Bulls eye!
Is there anyone you want to frame with flowers? Try it, you will love it!


7 comments :
So precious to have a long time friend and neighbor. You are giving her a piece of you to hold forever... Hugs Ger
It's beautiful; no wondered she loved it! Nice work, Allie.
What a lovely portrait! Such a sweet gift!
Aw, Tammy looks great all finished and framed!
And thanks for the shoutout. That was a lovely meetup. Hope to see you all again soon.
What a wonderful tribute to a good friend! It's beautiful. Thanks for going into detail and explaining how you mounted it. My son is working on his first small counted cross stitch piece and the closer he gets to finishing it, the more I've been wondering about what to do with it when it's done. He's also been learning to piece quilt blocks on one of my Featherweights, so now I'm thinking that maybe he could add (with mom's help) a fabric border and we could mount it the way you did your piece? Question about the photograph: You printed that on fabric, didn't you? Do you use one of the commercially prepared fabric sheets that go in inkjet printers, or some other method? I used the EQ inkjet printer sheets for a classroom quilt project a few months ago and I wasn't thrilled with them due to 1. cost, 2. fabric sheets not cut on grain and distorted after backing removed and excess dye rinsed out, and 3. when I washed the finished quilt, the dye faded CONSIDERABLY and I lost the vibrancy of the kids' artwork that I had gone to so much trouble and expense to scan and print onto fabric in the first place. So I'm open to trying something different the next time I get the urge to print on fabric!
Dear Allie, I wanted to let you know how much I am enjoying your Craftsy class, and your book. I refer to them all the time!
This week we had to put our beloved dog Benson to sleep, and I am making a memorial quilt to help me grieve, similar to your "Waltie".
Making the border patterns myself was so gratifying! So far I have the beginning of the center, and one of the borders curve pieced. I did not know about padding the photo, but will do that tonight.
I am blogging it at www.nickersmarie.blogspot.com.
Thank you so much for your inspiration.
Hugs,
Nicky in Waldport
Great post. Thank you for sharing your tips.Bangalore Web Services|
Web Designing Bangalore|
Post a Comment